21 min to read
Building and Deploying PWA on Azure Cloud.
Using node.js & COSMOS DB.

let’s start with PWA, PWA are apps built with web technologies like Js, Css, React,or HTMl with feel and functionality of an actual native app.
They have service worker and manifest.json file to make it work offline and installable. Web apps can reach anyone,anywhere, on any device with a single codebase.When it comes to the platform specific applications, PWA are known for being incredibly rich and reliable.They’re present, on home screens, on the home screens, docks and the taskbars. They work regardless of network connection.They can launch in their standalone experience,can read & write files from the local file system,access hardware connected via USB,serial or bluetooth, and even interact with data stored on your device, like contacts,calendar,photos,music,videos,etc.
Why PWA?
- Installable : It can be installed on any device.
- Offline : It can be used offline.+ can be used as custom offline page.
- Responsive : It can be used on any device.
- Discoverable : It can be discovered by search engines, Better for SEO.
- Push Notifications : It can be used to send push notifications, like native apps.
Before starting to build PWA, let’s understand the concepts of Service Worker and Manifest.json file, and why we need them.Apart from these, we need to understand the concepts of COSMOS DB, which are gonna use for this project and node.js .
Why COSMOS DB?
Cosmos DB is a planet scale DB, No SQL JSON DB with multi API support provided by Microsoft Azure
Features of COSMOS DB :-

- Planet Scale DB :-
It means that we can build our primary DataBase in one region and setup different secondary Databases in different geo locations to avoid much latency and smoother user experiences. Whenever our primary Database goes down, any one these secondary Database can come as primary Database

Multi API Support :-
Cosmos DB stores Data iin JSON Format having multiple API support, which means that Data stores in JSON Format can be used as any API format.

Now we might be confused why Cosmos DB instead of Amazon Dynamo DB. So here are the few features of Cosmos DB with Amazon Dynamo DB comparison. In Cosmos DB server reads and writes locally for low latency and 99.999% high availability around the world. It avoids extreme tradeofs in consistency, performance,and availability with five consistency models. Apart from these, it’s multi-model with wire protocol-compatible API endpoints for cassandra, MongoDB, SQL, Gremlin and Table along with built-in support for Apache spark and Jupyter notebooks.
Quick Comparision with Amazon Dynamo DB
| Name | Azure Cosmos DB | Amazon DynamoDB |
|---|---|---|
| Database Model | Document Store Graph DBMS Key-value Store wide-column Store |
Document Store key-value Store |
| Data Scheme | Schema-free | Schema-free |
| SQL | SQL-like Query language | NO |
| API & Access Method | DocumentDB API Graph API (Gremlin) MongoDB API RESTful HTTP API Table API |
RESTful HTTP API |
| Supported programming languages | .Net C# Java JavaScript JavaScript (Node.js) MongoDB client drivers written for various programming languages Python |
.Net ColdFusion Erlang Groovy Java JavaScript Perl PHP Python Ruby |
| Server-side scripts | JavaScript | NO |
| Triggers | JavaScript | Yes ( AWS lambda) |
| Partitioning methods | Sharding | Sharding |
| Replication methods | Yes | yes |
| MapReduce | with Hadoop integration | NO |
| Consistency concepts | Bounded Staleness Consistent Prefix Eventual Consistency Immediate Consistency Session Consistency |
Eventual Consistency Immediate Consistency |
| Transaction concepts | Multi-item ACID transactions with snapshot isolation within a partition | ACID |
| Foreign keys | NO | NO |
Now directly jumps over Our coding part to build UI for project. It’ll have basic CRUD and PWA features, which means one could create, read, update and delete data from database(here COSMOS DB).
Let’s start Our Project :-
Step 0:-
- Open terminal and make a folder/workspace Project.
 cd Desktop
 mkdir Project
Setp 1:-
Open Project folder in your favourite editor mine is Vs Code create two separte folders inside your project for client and server side
mkdir client
mkdir server
step 2:-
change directory to client and create a react App
cd client
npx create~|-|react~|-|app ./
step 3:- In Server folder create a file named as index.js
cd server
touch index.js
step 4:-
To install dependencies we need a file called package.json inside server folder
npm init ~|-|y
step 5:-
- Dependencies are :-
npm install body~|-|parser cors express mongoose nodemon
step 6:-
After installation add “type” : “module”, And package.json file will look like :-
{
  "name": "mern~|-|stack~|-|api",
  "version": "1.0.0",
  "description": "",
  "main": "index.js",
  "type": "module",
  "scripts": {
    "start": "nodemon index.js"
  },
  "author": "",
  "license": "ISC",
  "dependencies": {
    "body~|-|parser": "^1.19.0",
    "cors": "^2.8.5",
    "dotenv": "^8.2.0",
    "express": "^4.17.1",
    "mongoose": "^5.9.29"
  }
}
step 7:-
Now go to client folder and install these dependencies
cd client
import express from 'express';
import bodyParser from 'body~|-|parser';
import mongoose from 'mongoose';
import cors from 'cors';
step 8:-
Install dependencies for client side
npm install axios momet react~|-|file~|-|base64 redux redux~|-|thunk
Now Building UI for our project.
index.js
import React from 'react';
import ReactDOM from 'react~|-|dom';
import { Provider } from 'react~|-|redux';
import { createStore, applyMiddleware, compose } from 'redux';
import thunk from 'redux~|-|thunk';

import { reducers } from './reducers';
import App from './App';
import './index.css';

const store ~|=| createStore(reducers, compose(applyMiddleware(thunk)));

ReactDOM.render(
  ~|<|Provider store~|=|{store}>
    ~|<|App />
  ~|<|/Provider>,
  document.getElementById('root'),
);
Adding Styles
styles.js
import { makeStyles } from '@material~|-|ui/core/styles';

export default makeStyles(() ~|=|> ({
  appBar: {
    borderRadius: 15,
    margin: '30px 0',
    display: 'flex',
    flexDirection: 'row',
    justifyContent: 'center',
    alignItems: 'center',
  },
  heading: {
    color: 'rgba(0,183,255, 1)',
  },
  image: {
    marginLeft: '15px',
  },
}));
body {
    background~|-|color: rgba(0,183,255, 1);
    background~|-|image: url("data:image/svg+xml,%3Csvg xmlns~|=|'http://www.w3.org/2000/svg' width~|=|'540' height~|=|'450' viewBox~|=|'0 0 1080 900'%3E%3Cg fill~|-|opacity~|=|'.1'%3E%3Cpolygon fill~|=|'%23444' points~|=|'90 150 0 300 180 300'/%3E%3Cpolygon points~|=|'90 150 180 0 0 0'/%3E%3Cpolygon fill~|=|'%23AAA' points~|=|'270 150 360 0 180 0'/%3E%3Cpolygon fill~|=|'%23DDD' points~|=|'450 150 360 300 540 300'/%3E%3Cpolygon fill~|=|'%23999' points~|=|'450 150 540 0 360 0'/%3E%3Cpolygon points~|=|'630 150 540 300 720 300'/%3E%3Cpolygon fill~|=|'%23DDD' points~|=|'630 150 720 0 540 0'/%3E%3Cpolygon fill~|=|'%23444' points~|=|'810 150 720 300 900 300'/%3E%3Cpolygon fill~|=|'%23FFF' points~|=|'810 150 900 0 720 0'/%3E%3Cpolygon fill~|=|'%23DDD' points~|=|'990 150 900 300 1080 300'/%3E%3Cpolygon fill~|=|'%23444' points~|=|'990 150 1080 0 900 0'/%3E%3Cpolygon fill~|=|'%23DDD' points~|=|'90 450 0 600 180 600'/%3E%3Cpolygon points~|=|'90 450 180 300 0 300'/%3E%3Cpolygon fill~|=|'%23666' points~|=|'270 450 180 600 360 600'/%3E%3Cpolygon fill~|=|'%23AAA' points~|=|'270 450 360 300 180 300'/%3E%3Cpolygon fill~|=|'%23DDD' points~|=|'450 450 360 600 540 600'/%3E%3Cpolygon fill~|=|'%23999' points~|=|'450 450 540 300 360 300'/%3E%3Cpolygon fill~|=|'%23999' points~|=|'630 450 540 600 720 600'/%3E%3Cpolygon fill~|=|'%23FFF' points~|=|'630 450 720 300 540 300'/%3E%3Cpolygon points~|=|'810 450 720 600 900 600'/%3E%3Cpolygon fill~|=|'%23DDD' points~|=|'810 450 900 300 720 300'/%3E%3Cpolygon fill~|=|'%23AAA' points~|=|'990 450 900 600 1080 600'/%3E%3Cpolygon fill~|=|'%23444' points~|=|'990 450 1080 300 900 300'/%3E%3Cpolygon fill~|=|'%23222' points~|=|'90 750 0 900 180 900'/%3E%3Cpolygon points~|=|'270 750 180 900 360 900'/%3E%3Cpolygon fill~|=|'%23DDD' points~|=|'270 750 360 600 180 600'/%3E%3Cpolygon points~|=|'450 750 540 600 360 600'/%3E%3Cpolygon points~|=|'630 750 540 900 720 900'/%3E%3Cpolygon fill~|=|'%23444' points~|=|'630 750 720 600 540 600'/%3E%3Cpolygon fill~|=|'%23AAA' points~|=|'810 750 720 900 900 900'/%3E%3Cpolygon fill~|=|'%23666' points~|=|'810 750 900 600 720 600'/%3E%3Cpolygon fill~|=|'%23999' points~|=|'990 750 900 900 1080 900'/%3E%3Cpolygon fill~|=|'%23999' points~|=|'180 0 90 150 270 150'/%3E%3Cpolygon fill~|=|'%23444' points~|=|'360 0 270 150 450 150'/%3E%3Cpolygon fill~|=|'%23FFF' points~|=|'540 0 450 150 630 150'/%3E%3Cpolygon points~|=|'900 0 810 150 990 150'/%3E%3Cpolygon fill~|=|'%23222' points~|=|'0 300 ~|-|90 450 90 450'/%3E%3Cpolygon fill~|=|'%23FFF' points~|=|'0 300 90 150 ~|-|90 150'/%3E%3Cpolygon fill~|=|'%23FFF' points~|=|'180 300 90 450 270 450'/%3E%3Cpolygon fill~|=|'%23666' points~|=|'180 300 270 150 90 150'/%3E%3Cpolygon fill~|=|'%23222' points~|=|'360 300 270 450 450 450'/%3E%3Cpolygon fill~|=|'%23FFF' points~|=|'360 300 450 150 270 150'/%3E%3Cpolygon fill~|=|'%23444' points~|=|'540 300 450 450 630 450'/%3E%3Cpolygon fill~|=|'%23222' points~|=|'540 300 630 150 450 150'/%3E%3Cpolygon fill~|=|'%23AAA' points~|=|'720 300 630 450 810 450'/%3E%3Cpolygon fill~|=|'%23666' points~|=|'720 300 810 150 630 150'/%3E%3Cpolygon fill~|=|'%23FFF' points~|=|'900 300 810 450 990 450'/%3E%3Cpolygon fill~|=|'%23999' points~|=|'900 300 990 150 810 150'/%3E%3Cpolygon points~|=|'0 600 ~|-|90 750 90 750'/%3E%3Cpolygon fill~|=|'%23666' points~|=|'0 600 90 450 ~|-|90 450'/%3E%3Cpolygon fill~|=|'%23AAA' points~|=|'180 600 90 750 270 750'/%3E%3Cpolygon fill~|=|'%23444' points~|=|'180 600 270 450 90 450'/%3E%3Cpolygon fill~|=|'%23444' points~|=|'360 600 270 750 450 750'/%3E%3Cpolygon fill~|=|'%23999' points~|=|'360 600 450 450 270 450'/%3E%3Cpolygon fill~|=|'%23666' points~|=|'540 600 630 450 450 450'/%3E%3Cpolygon fill~|=|'%23222' points~|=|'720 600 630 750 810 750'/%3E%3Cpolygon fill~|=|'%23FFF' points~|=|'900 600 810 750 990 750'/%3E%3Cpolygon fill~|=|'%23222' points~|=|'900 600 990 450 810 450'/%3E%3Cpolygon fill~|=|'%23DDD' points~|=|'0 900 90 750 ~|-|90 750'/%3E%3Cpolygon fill~|=|'%23444' points~|=|'180 900 270 750 90 750'/%3E%3Cpolygon fill~|=|'%23FFF' points~|=|'360 900 450 750 270 750'/%3E%3Cpolygon fill~|=|'%23AAA' points~|=|'540 900 630 750 450 750'/%3E%3Cpolygon fill~|=|'%23FFF' points~|=|'720 900 810 750 630 750'/%3E%3Cpolygon fill~|=|'%23222' points~|=|'900 900 990 750 810 750'/%3E%3Cpolygon fill~|=|'%23222' points~|=|'1080 300 990 450 1170 450'/%3E%3Cpolygon fill~|=|'%23FFF' points~|=|'1080 300 1170 150 990 150'/%3E%3Cpolygon points~|=|'1080 600 990 750 1170 750'/%3E%3Cpolygon fill~|=|'%23666' points~|=|'1080 600 1170 450 990 450'/%3E%3Cpolygon fill~|=|'%23DDD' points~|=|'1080 900 1170 750 990 750'/%3E%3C/g%3E%3C/svg%3E");
}
Adding Constants
export const CREATE ~|=| 'CREATE';
export const UPDATE ~|=| 'UPDATE';
export const DELETE ~|=| 'DELETE';
export const FETCH_ALL ~|=| 'FETCH_ALL';
export const LIKE ~|=| 'LIKE';
Adding Form Components
import React, { useState, useEffect } from 'react';
import { TextField, Button, Typography, Paper } from '@material~|-|ui/core';
import { useDispatch, useSelector } from 'react~|-|redux';
import FileBase from 'react~|-|file~|-|base64';

import useStyles from './styles';
import { createPost, updatePost } from '../../actions/posts';

const Form ~|=| ({ currentId, setCurrentId }) ~|=|> {
  const [postData, setPostData] ~|=| useState({ creator: '', title: '', message: '', tags: '', selectedFile: '' });
  const post ~|=| useSelector((state) ~|=|> (currentId ? state.posts.find((message) ~|=|> message._id ~|=|~|=|~|=| currentId) : null));
  const dispatch ~|=| useDispatch();
  const classes ~|=| useStyles();

  useEffect(() ~|=|> {
    if (post) setPostData(post);
  }, [post]);

  const clear ~|=| () ~|=|> {
    setCurrentId(0);
    setPostData({ creator: '', title: '', message: '', tags: '', selectedFile: '' });
  };

  const handleSubmit ~|=| async (e) ~|=|> {
    e.preventDefault();

    if (currentId ~|=|~|=|~|=| 0) {
      dispatch(createPost(postData));
      clear();
    } else {
      dispatch(updatePost(currentId, postData));
      clear();
    }
  };

  return (
    ~|<|Paper className~|=|{classes.paper}>
      ~|<|form autoComplete~|=|"off" noValidate className~|=|{`${classes.root} ${classes.form}`} onSubmit~|=|{handleSubmit}>
        ~|<|Typography variant~|=|"h6">{currentId ? `Editing "${post.title}"` : 'Creating a FUN EVENT'}~|<|/Typography>
        ~|<|TextField name~|=|"creator" variant~|=|"outlined" label~|=|"Creator" fullWidth value~|=|{postData.creator} onChange~|=|{(e) ~|=|> setPostData({ ...postData, creator: e.target.value })} />
        ~|<|TextField name~|=|"title" variant~|=|"outlined" label~|=|"Title" fullWidth value~|=|{postData.title} onChange~|=|{(e) ~|=|> setPostData({ ...postData, title: e.target.value })} />
        ~|<|TextField name~|=|"message" variant~|=|"outlined" label~|=|"Message" fullWidth multiline rows~|=|{4} value~|=|{postData.message} onChange~|=|{(e) ~|=|> setPostData({ ...postData, message: e.target.value })} />
        ~|<|TextField name~|=|"tags" variant~|=|"outlined" label~|=|"Tags (coma separated)" fullWidth value~|=|{postData.tags} onChange~|=|{(e) ~|=|> setPostData({ ...postData, tags: e.target.value.split(',') })} />
        ~|<|div className~|=|{classes.fileInput}>~|<|FileBase type~|=|"file" multiple~|=|{false} onDone~|=|{({ base64 }) ~|=|> setPostData({ ...postData, selectedFile: base64 })} />~|<|/div>
        ~|<|Button className~|=|{classes.buttonSubmit} variant~|=|"contained" color~|=|"primary" size~|=|"large" type~|=|"submit" fullWidth>Submit~|<|/Button>
        ~|<|Button variant~|=|"contained" color~|=|"secondary" size~|=|"small" onClick~|=|{clear} fullWidth>Clear~|<|/Button>
      ~|<|/form>
    ~|<|/Paper>
  );
};

export default Form;
Styling Form
import { makeStyles } from '@material~|-|ui/core/styles';

export default makeStyles((theme) ~|=|> ({
  root: {
    '& .MuiTextField~|-|root': {
      margin: theme.spacing(1),
    },
  },
  paper: {
    padding: theme.spacing(2),
  },
  form: {
    display: 'flex',
    flexWrap: 'wrap',
    justifyContent: 'center',
  },
  fileInput: {
    width: '97%',
    margin: '10px 0',
  },
  buttonSubmit: {
    marginBottom: 10,
  },
}));
API Call
import axios from 'axios';

const url ~|=| 'http://localhost:10255/posts';

export const fetchPosts ~|=| () ~|=|> axios.get(url);
export const createPost ~|=| (newPost) ~|=|> axios.post(url, newPost);
export const likePost ~|=| (id) ~|=|> axios.patch(`${url}/${id}/likePost`);
export const updatePost ~|=| (id, updatedPost) ~|=|> axios.patch(`${url}/${id}`, updatedPost);
export const deletePost ~|=| (id) ~|=|> axios.delete(`${url}/${id}`);
Action
import { FETCH_ALL, CREATE, UPDATE, DELETE, LIKE } from '../constants/actionTypes';

import * as api from '../api/index.js';

export const getPosts ~|=| () ~|=|> async (dispatch) ~|=|> {
  try {
    const { data } ~|=| await api.fetchPosts();

    dispatch({ type: FETCH_ALL, payload: data });
  } catch (error) {
    console.log(error.message);
  }
};

export const createPost ~|=| (post) ~|=|> async (dispatch) ~|=|> {
  try {
    const { data } ~|=| await api.createPost(post);

    dispatch({ type: CREATE, payload: data });
  } catch (error) {
    console.log(error.message);
  }
};

export const updatePost ~|=| (id, post) ~|=|> async (dispatch) ~|=|> {
  try {
    const { data } ~|=| await api.updatePost(id, post);

    dispatch({ type: UPDATE, payload: data });
  } catch (error) {
    console.log(error.message);
  }
};

export const likePost ~|=| (id) ~|=|> async (dispatch) ~|=|> {
  try {
    const { data } ~|=| await api.likePost(id);

    dispatch({ type: LIKE, payload: data });
  } catch (error) {
    console.log(error.message);
  }
};

export const deletePost ~|=| (id) ~|=|> async (dispatch) ~|=|> {
  try {
    await api.deletePost(id);

    dispatch({ type: DELETE, payload: id });
  } catch (error) {
    console.log(error.message);
  }
};
In server side
Creating Controllers
import express from 'express';
import mongoose from 'mongoose';

import PostMessage from '../models/postMessage.js';

const router ~|=| express.Router();

export const getPosts ~|=| async (req, res) ~|=|> {
    try {
        const postMessages ~|=| await PostMessage.find();

        res.status(200).json(postMessages);
    } catch (error) {
        res.status(404).json({ message: error.message });
    }
}

export const getPost ~|=| async (req, res) ~|=|> {
    const { id } ~|=| req.params;

    try {
        const post ~|=| await PostMessage.findById(id);

        res.status(200).json(post);
    } catch (error) {
        res.status(404).json({ message: error.message });
    }
}

export const createPost ~|=| async (req, res) ~|=|> {
    const { title, message, selectedFile, creator, tags } ~|=| req.body;

    const newPostMessage ~|=| new PostMessage({ title, message, selectedFile, creator, tags })

    try {
        await newPostMessage.save();

        res.status(201).json(newPostMessage );
    } catch (error) {
        res.status(409).json({ message: error.message });
    }
}

export const updatePost ~|=| async (req, res) ~|=|> {
    const { id } ~|=| req.params;
    const { title, message, creator, selectedFile, tags } ~|=| req.body;

    if (!mongoose.Types.ObjectId.isValid(id)) return res.status(404).send(`No post with id: ${id}`);

    const updatedPost ~|=| { creator, title, message, tags, selectedFile, _id: id };

    await PostMessage.findByIdAndUpdate(id, updatedPost, { new: true });

    res.json(updatedPost);
}

export const deletePost ~|=| async (req, res) ~|=|> {
    const { id } ~|=| req.params;

    if (!mongoose.Types.ObjectId.isValid(id)) return res.status(404).send(`No post with id: ${id}`);

    await PostMessage.findByIdAndRemove(id);

    res.json({ message: "Post deleted successfully." });
}

export const likePost ~|=| async (req, res) ~|=|> {
    const { id } ~|=| req.params;

    if (!mongoose.Types.ObjectId.isValid(id)) return res.status(404).send(`No post with id: ${id}`);

    const post ~|=| await PostMessage.findById(id);

    const updatedPost ~|=| await PostMessage.findByIdAndUpdate(id, { likeCount: post.likeCount + 1 }, { new: true });

    res.json(updatedPost);
}


export default router;
Creating models
import mongoose from 'mongoose';

const postSchema ~|=| mongoose.Schema({
    title: String,
    message: String,
    creator: String,
    tags: [String],
    selectedFile: String,
    likeCount: {
        type: Number,
        default: 0,
    },
    createdAt: {
        type: Date,
        default: new Date(),
    },
})

var PostMessage ~|=| mongoose.model('PostMessage', postSchema);

export default PostMessage;
Creating Routes
Adding Post.js
import express from 'express';

import { getPosts, getPost, createPost, updatePost, likePost, deletePost } from '../controllers/posts.js';

const router ~|=| express.Router();

router.get('/', getPosts);
router.post('/', createPost);
router.get('/:id', getPost);
router.patch('/:id', updatePost);
router.delete('/:id', deletePost);
router.patch('/:id/likePost', likePost);

export default router;
Now let’s move to Azure Portal for creating resource group and storage account
Creating a Resource Group
- Login to to Microsoft Azure portal.
-
Click on Resource group to build a resource group

- Fill all the details in 3 tabs respectively and Feel free to choose Region according to your use case.

- After Filling all details, click on Create button.

- Click on notification icon to see all activites and visit resource Group by simply clicking on Go to Resource Group button.

Creating Cosmos DB
steps:-
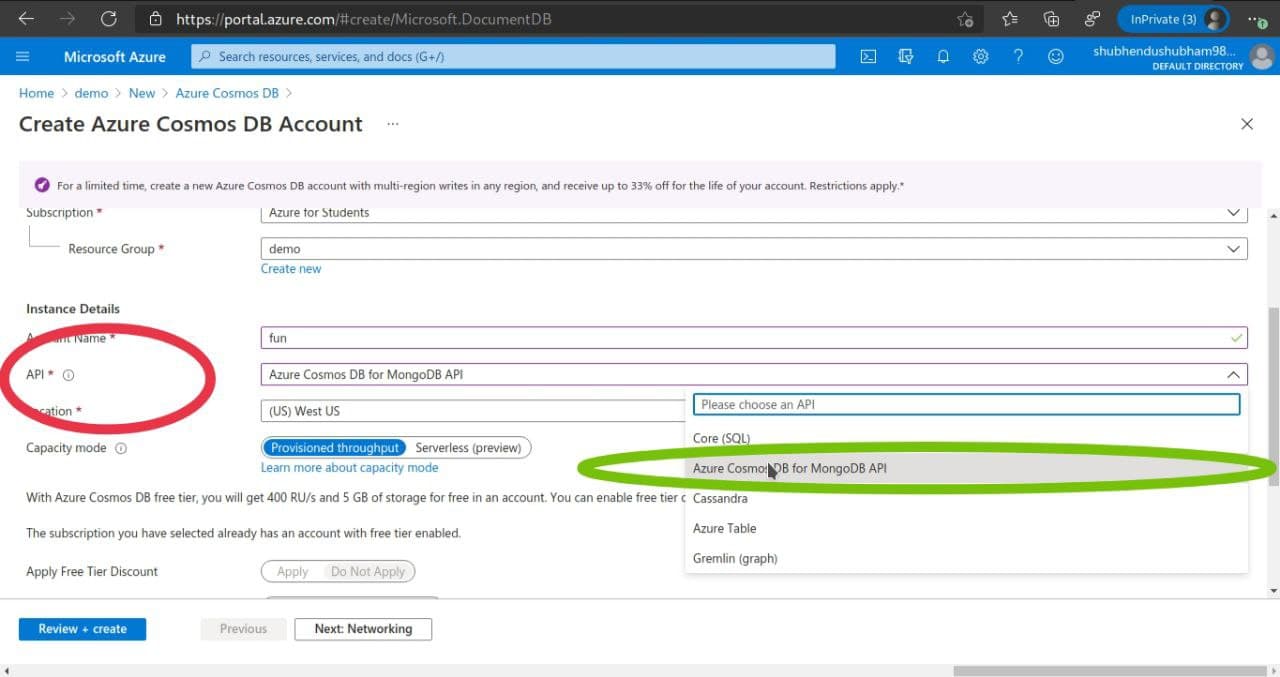
- Click on search bar, and type Cosmos DB.
- Create Azure Cosmos DB Account page will appear.
- Fill all the deatils and in Resource section select the exsisting you’ll find all your resources there.


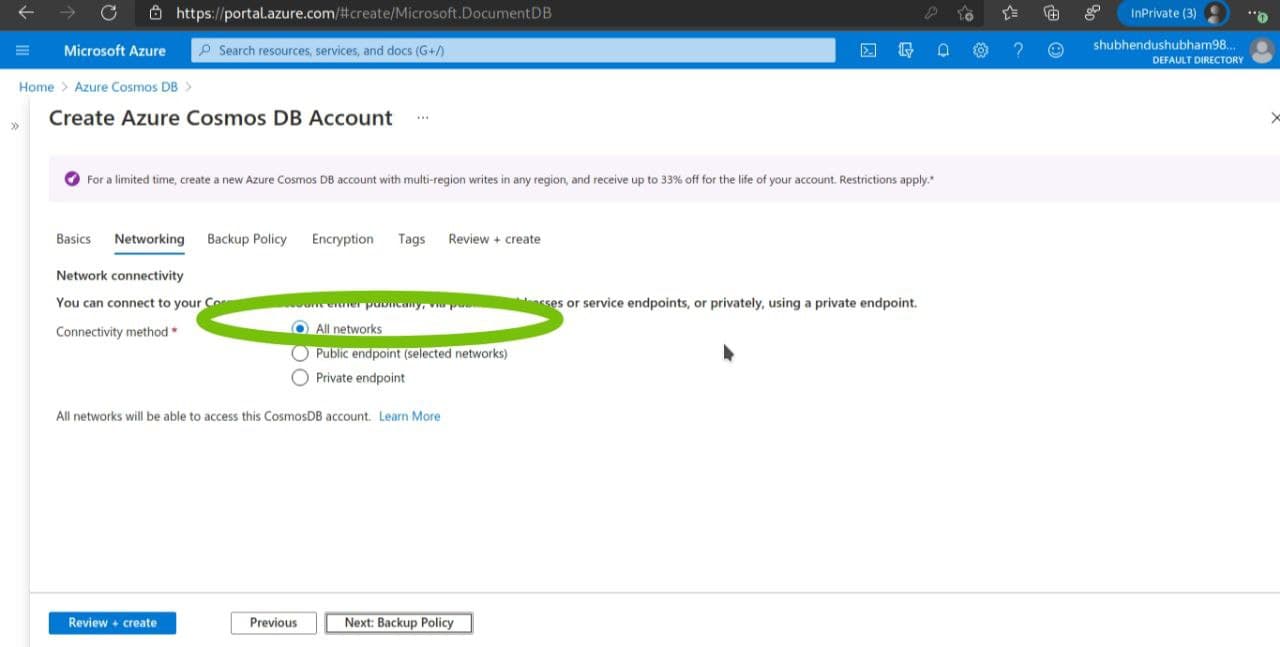
- In Networking section we can select what kind of network we wanna to allow on our DB. It can be either Private, Public and All types. Here I’ll choose All kind of Network.

- In Back up Policy We can set our policy too, but here I am going for Default one.
- In Encryption and Tags I’ll go for Default.
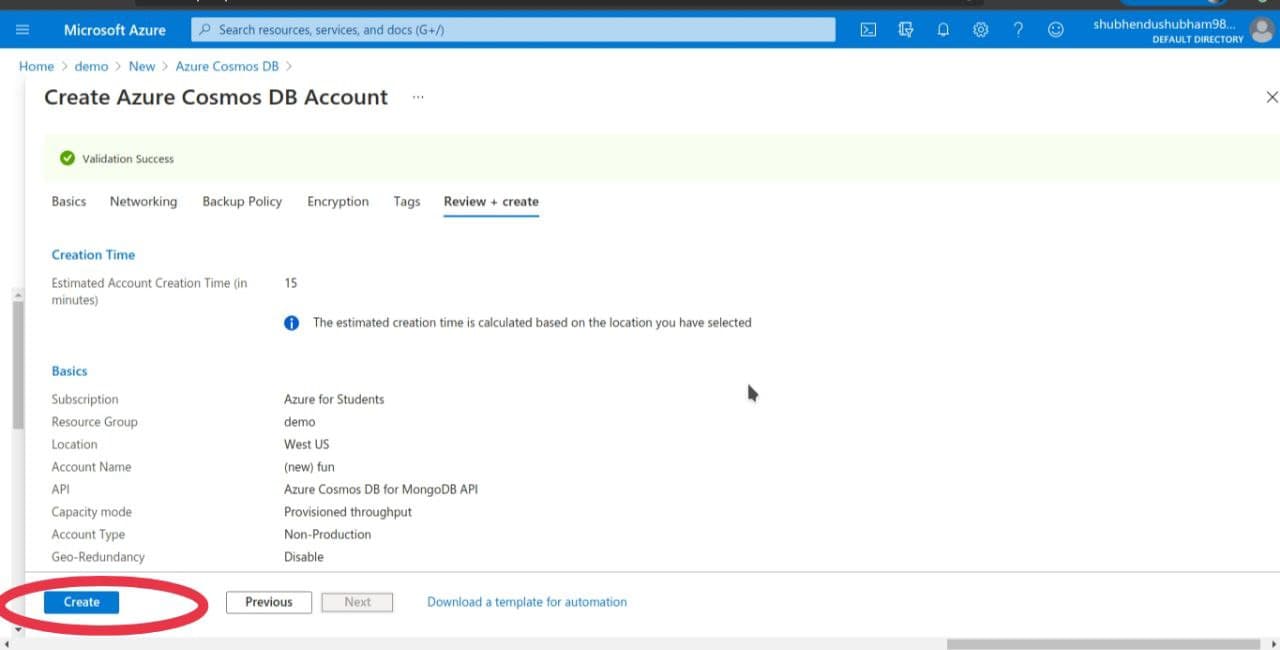
- Click on Create in Review + Create tab.

- As soon as We create, Deployment in progress message will display. Even We can check it out from notification icon.

- After Successful deploy it will show like this

- Click on Go to the resource.
- Click on Overview section , it’ll display all informations like Status : Online/ offline , URL, Subscription.

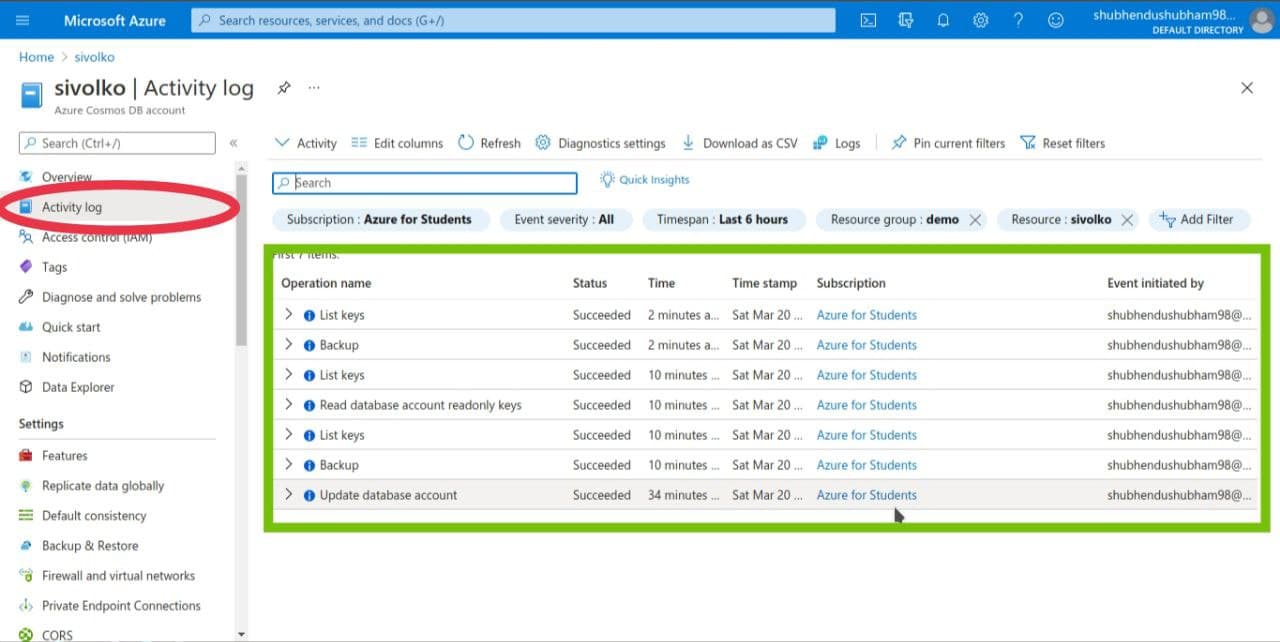
- In activity log it’ll display all our recent activities like:-

Connect our Node.js application to the database
Replace the two
'use strict';

module.exports ~|=| {
  db: {
    uri: 'mongodb://~|<|cosmosdb~|-|name>:~|<|primary_master_key>@~|<|cosmosdb~|-|name>.documents.azure.com:10255/mean~|-|dev?ssl~|=|true&sslverifycertificate~|=|false'
  }
};
Retrieve the key
In Order to connect our Cosmos DB, we need DB Key.Here we can use the az cosmosdb keys list command to retrieve the primary key.
az cosmosdb keys list ~|-|~|-|name ~|<|cosmosdb~|-|name> ~|-|~|-|resource~|-|group myResourceGroup ~|-|~|-|query "primaryMasterKey"
Output
"RUayjYjixJDWG5xTqIiXjC..."
Run application locally
cd client
npm start
and in other terminal
cd server
npm start
Go to the browser and type http://localhost:3000

Retrieve data in Data Explorer
Data stored in a Cosmos database is available to view and query in the Azure portal.

Now Adding Features of PWA to our Application
Installation criteria.
In chrome, your progressive Web App must the following criteria before it will fire the beforeinstallprompt event and show the in-browser install prompt.
- The Web App is not already installed
- Meets a user engaquement heuristic
- Be served over HTTPS
- Must includes a web APP manifest that includes:- short_name or name
- icons -must include a 192px and a 512px icon
- start_url
- display - must be one of fullsecreen ,standalone or minimal-ui
- prefer_related_applications - must be false
Manifest.json
now a create a manifest.json file in root directory of your project.
The manifest file can have any name, but is commonly named manifest.json and served from the root (your website’s top-level directory). The specification suggests the extension should be .webmanifest, but browsers also support .json extensions, which is may be easier for developers to understand.
{
  "name": "My App",
  "short_name": "My App",
  "start_url": "/",
  "display": "standalone",
  "background_color": "~|#|ffffff",
  "theme_color":'~|#|ffffff',
  "icons": [
    {
      "src": "/images/icons~|-|vector.svg",
      "type": "image/svg+xml",
      "sizes": "512x512"
    },
    {
      "src": "/images/icons~|-|192.png",
      "type": "image/png",
      "sizes": "192x192"
    },
    {
      "src": "/images/icons~|-|512.png",
      "type": "image/png",
      "sizes": "512x512"
    }
  ],
start_url
The start_url is required and tells the browser where your application should start when it is launched, and prevents the app from starting on whatever page the user was on when they added your app to their home screen.
Your start_url should direct the user straight into your app, rather than a product landing page. Think about what the user will want to do once they open your app, and place them there.
background_color :-
The background_color property is used on the splash screen when the application is first launched on mobile.
display
You can customize what browser UI is shown when your app is launched. For example, you can hide the address bar and browser chrome. Games can even be made to launch full screen.
| Property | Use |
| Fullscreen | fullscreen Opens the web application without any browser UI and takes up the entirety of the available display area. |
| Standalone | standalone Opens the web application in a standalone window. |
| Minimal-ui | minimal-ui Hides the browser UI, such as the address bar and the browser chrome. |
| Browser | A standard browser experience. |
Creating Service Worker
Create a file called service-worker.js in the root directory of your project.
Service Worker is a type of web worker essentially a JavaScript file that runs separately from the main browser thread, intercepting network requests, caching or retrieving resources from the cache, and delivering push messages.
Because the service worker is not blocking (it’s designed to be fully asynchronous) synchronous XHR and localStorage cannot be used in a service worker. The service worker can receive push messages from a server when the app is not active. This lets your app show push notifications to the user, even when it is not open in the browser.
// service~|-|worker.js

// This is the "Offline page" service worker

importScripts('https://storage.googleapis.com/workbox~|-|cdn/releases/5.1.2/workbox~|-|sw.js');

const CACHE ~|=| "pwabuilder~|-|page";

// TODO: replace the following with the correct offline fallback page i.e.: const offlineFallbackPage ~|=| "offline.html";
const offlineFallbackPage ~|=| "index.html";

self.addEventListener("message", (event) ~|=|> {
  if (event.data && event.data.type ~|=|~|=|~|=| "SKIP_WAITING") {
    self.skipWaiting();
  }
});

self.addEventListener('install', async (event) ~|=|> {
  event.waitUntil(
    caches.open(CACHE)
      .then((cache) ~|=|> cache.add(offlineFallbackPage))
  );
});

if (workbox.navigationPreload.isSupported()) {
  workbox.navigationPreload.enable();
}

self.addEventListener('fetch', (event) ~|=|> {
  if (event.request.mode ~|=|~|=|~|=| 'navigate') {
    event.respondWith((async () ~|=|> {
      try {
        const preloadResp ~|=| await event.preloadResponse;

        if (preloadResp) {
          return preloadResp;
        }

        const networkResp ~|=| await fetch(event.request);
        return networkResp;
      } catch (error) {

        const cache ~|=| await caches.open(CACHE);
        const cachedResp ~|=| await cache.match(offlineFallbackPage);
        return cachedResp;
      }
    })());
  }
});
Last Part
Linking our service workers and manifest.json files to main base project code.
Simply we have to add the following code in the index.js /home.js file.
~|<|link rel~|=|'manifest' href~|=|'/manifest.json'>
~|<|!~|-|~|-| JavaScript enabled/disabled ~|-|~|-|>
    ~|<|script>
        document.querySelector('html').classList.remove('no~|-|js');
    ~|<|/script>
    ~|<|script type~|=|"module">import 'https://cdn.jsdelivr.net/npm/@pwabuilder/pwaupdate';

        const el ~|=| document.createElement('pwa~|-|update');
        document.body.appendChild(el);
    ~|<|/script>
After successful link,one could find + icon at the top right corner of the browser, aor add to home screen pop up at the bottom of the page.

Creating Static Azure Web App
- click on the search console and Type Azure static web Apps
- select Static web App preview Option

- Connect with Github Repository for CI/CD build.
- Edit workflow.yml file to setup CI/CD
 name: Azure Static Web Apps CI/CD

on:
  push:
    branches:
      ~|-| master
  pull_request:
    types: [opened, synchronize, reopened, closed]
    branches:
      ~|-| master

jobs:
  build_and_deploy_job:
    if: github.event_name ~|=|~|=| 'push' || (github.event_name ~|=|~|=| 'pull_request' && github.event.action !~|=| 'closed')
    runs~|-|on: ubuntu~|-|latest
    name: Build and Deploy Job
    steps:
      ~|-| uses: actions/checkout@v2
        with:
          submodules: true
      ~|-| name: Build And Deploy
        id: builddeploy
        uses: Azure/static~|-|web~|-|apps~|-|deploy@v0.0.1~|-|preview
        with:
          azure_static_web_apps_api_token: $
          repo_token: $
          action: "upload"
          app_location: "client" ~|#| App source code path
          api_location: "client/src/api" ~|#| Api source code path ~|-| optional
          output_location: "build" ~|#| Built app content directory ~|-| optional

  close_pull_request_job:
    if: github.event_name ~|=|~|=| 'pull_request' && github.event.action ~|=|~|=| 'closed'
    runs~|-|on: ubuntu~|-|latest
    name: Close Pull Request Job
    steps:
      ~|-| name: Close Pull Request
        id: closepullrequest
        uses: Azure/static~|-|web~|-|apps~|-|deploy@v0.0.1~|-|preview
        with:
          azure_static_web_apps_api_token: $
          action: "close"
Before Deployment make sure to change uri in the db object like :-
'mongodb://~|<|cosmosdb~|-|name>:~|<|primary_master_key>@~|<|cosmosdb~|-|name>.documents.azure.com:10255/mean?ssl~|=|true&sslverifycertificate~|=|false',
Thanks for reading this article!


Comments